

If you have inherited an old Ubuntu 14.04 server or virtual machine and suddenly find that the filesystem is running out of disk space, extending the storage can be a little confusing.
This guide walks through the process of increasing disk space on an Ubuntu 14.04 server using LVM, including the steps required after increasing the virtual disk in VMware.
Although Ubuntu 14.04 is now a legacy operating system, these systems still exist in production, lab environments and old applications that cannot easily be upgraded.
Important: Ubuntu 14.04 reached end of standard support in 2019. Only use this guide for systems that genuinely need to remain on this legacy release. Always take a backup or snapshot before making partition or filesystem changes.
The basic process
When increasing the storage of an Ubuntu virtual machine, there are several separate layers involved:
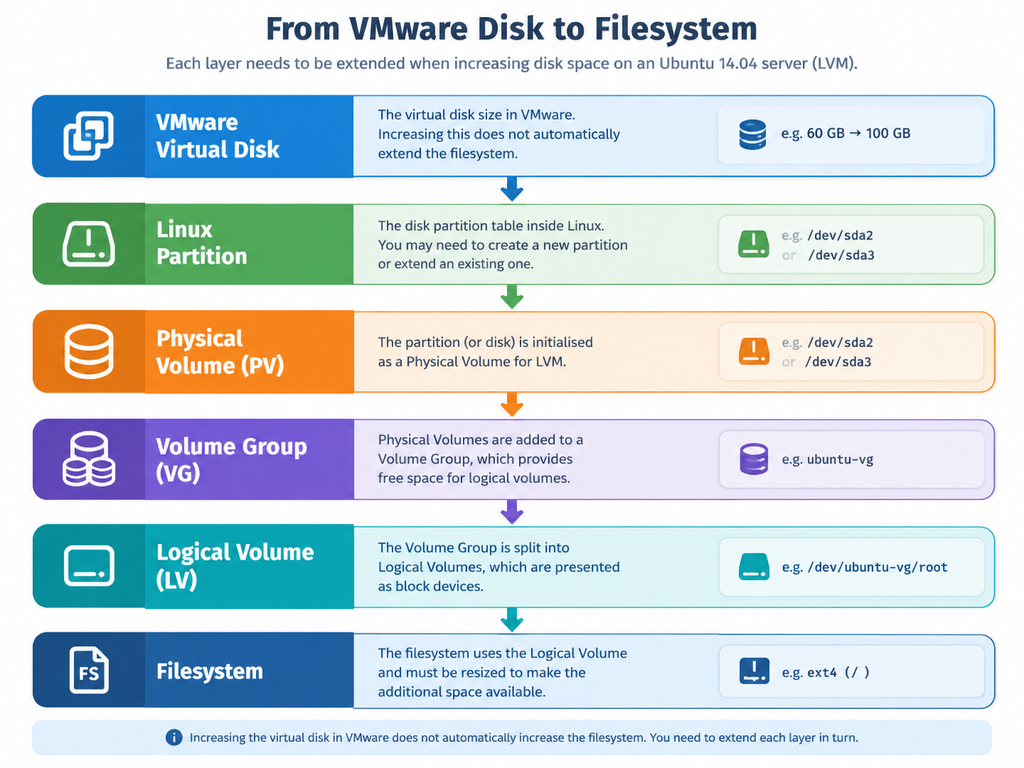
Depending on how the server is configured, you may need to extend one or more of these layers.
For an LVM-based server, the usual process is:
- Increase the virtual disk in VMware.
- Make Linux detect the additional space.
- Create or extend the partition.
- Resize the LVM Physical Volume.
- Extend the Logical Volume.
- Extend the filesystem.
- Confirm that the additional space is available.
1. Check the current disk layout
Before making any changes, find out how the server is currently configured.
Start with:
df -h
This shows the filesystems and how much space they are currently using.
For example:
Filesystem                  Size  Used Avail Use% Mounted on
/dev/mapper/ubuntu--vg-root  20G   19G  1.0G  95% /
In this example, the root filesystem is only 20 GB and is almost full.
Next, look at the disks and partitions:
lsblk
You can also use:
sudo fdisk -l
And, because this is an LVM system, check the physical volumes, volume groups and logical volumes:
sudo pvs
sudo vgs
sudo lvs
These commands are extremely useful because they show where the available space actually exists.
2. Increase the virtual disk in VMware
If this is a VMware virtual machine, first increase the size of the virtual hard disk in vCenter or the VMware management interface.
For example, you might increase:
60 GB → 100 GB
At this point VMware knows about the additional 40 GB, but Ubuntu may still be reporting the original disk size.
Depending on the Ubuntu/kernel configuration, a reboot may be required.
For a legacy Ubuntu 14.04 server, I would generally recommend scheduling a reboot rather than relying on a storage rescan if the system is not known to support the required hot-rescan workflow.
After the reboot, check:
sudo fdisk -l
You should now see the larger disk.
For example:
Disk /dev/sda: 100 GiB
3. Identify the available space
Run:
sudo fdisk -l /dev/sda
You may see something similar to:
Device     Boot      Start       End   Sectors  Size Id Type
/dev/sda1  *          2048  10485759 10483712    5G 83 Linux
/dev/sda2       10485760 125829119 115343360   55G 8e Linux LVM
If the disk is now 100 GB but the final partition ends at 60 GB, the remaining space is currently unallocated.
For example:
/dev/sda
├── /dev/sda1
└── /dev/sda2    60 GB
                   │
                   └── 40 GB unallocated
The exact layout will vary between servers, so do not blindly copy partition numbers from this example.
4. Create a partition using the new space
If the additional disk space is outside the existing LVM partition, create a new partition using the available space.
On Ubuntu 14.04, fdisk is commonly available:
sudo fdisk /dev/sda
Inside fdisk, use:
n
to create a new partition.
Select the default start and end sectors if you want to use all of the available space.
Then change the partition type to Linux LVM:
t
and select:
8e
Finally, review the changes with:
p
If everything looks correct, write the changes:
w
Be careful
fdisk modifies the partition table. Selecting the wrong disk or deleting an existing partition can cause data loss.
Always verify the device name with:
lsblk
before making changes.
5. Check that Linux sees the new partition
Run:
lsblk
You should now see something similar to:
sda
├─sda1
├─sda2
└─sda3
If the new partition does not appear immediately, try:
sudo partprobe
Then check again:
lsblk
On some older systems, a reboot may be required before the kernel recognises the updated partition table.
6. Create an LVM Physical Volume
If the new partition is going to be added to LVM, initialise it as a Physical Volume:
sudo pvcreate /dev/sda3
You should see a message similar to:
Physical volume "/dev/sda3" successfully created
Confirm it with:
sudo pvs
You should now see /dev/sda3 listed as an LVM Physical Volume.
7. Add the Physical Volume to the Volume Group
Next, identify the existing Volume Group:
sudo vgs
For example:
VG         #PV #LV #SN Attr   VSize  VFree
ubuntu-vg    2   1   0 wz--n-  95.00g 40.00g
In this example, the Volume Group is:
ubuntu-vg
Add the new Physical Volume:
sudo vgextend ubuntu-vg /dev/sda3
Check the result:
sudo vgs
The available free space should now have increased.
8. Extend the Logical Volume
Now identify the Logical Volume:
sudo lvs
You might see:
LV   VG         Attr       LSize
root ubuntu-vg  -wi-ao---- 55.00g
The Logical Volume path would therefore be:
/dev/ubuntu-vg/root
You can extend it by a specific amount.
For example, to add 20 GB:
sudo lvextend -L +20G /dev/ubuntu-vg/root
Or, if you want to allocate all remaining free space in the Volume Group:
sudo lvextend -l +100%FREE /dev/ubuntu-vg/root
The + is important.
For example:
-L +20G
means add 20 GB.
Without the +, the value represents the new total size of the Logical Volume rather than the amount to add.
Ubuntu’s LVM documentation also documents the +100%FREE approach for allocating the remaining free extents.
9. Extend the filesystem
At this point the Logical Volume has been increased, but the filesystem may still be the original size.
Check:
df -h
If the filesystem has not grown, it needs to be resized.
For an ext3/ext4 filesystem, use:
sudo resize2fs /dev/ubuntu-vg/root
You should see output indicating that the filesystem has been resized.
Check again:
df -h
The additional space should now be available.
10. A simpler LVM approach
On versions of LVM that support it, lvextend can resize the Logical Volume and filesystem together using -r:
sudo lvextend -r -l +100%FREE /dev/ubuntu-vg/root
The -r option tells LVM to resize the underlying filesystem as part of the operation. The Xenial/Ubuntu 16.04 lvextend documentation confirms support for --resizefs, although on an old Ubuntu 14.04 server I prefer the explicit two-step approach because it makes it much clearer what is happening.
For a legacy server, I would therefore use:
sudo lvextend -l +100%FREE /dev/ubuntu-vg/root
sudo resize2fs /dev/ubuntu-vg/root
Extending an existing LVM partition instead
The above example assumes that the additional disk space requires a new partition such as /dev/sda3.
There is another common scenario.
If you increased the size of a disk and the existing LVM partition itself now has additional space available, you may only need to resize the existing Physical Volume.
For example:
sudo pvresize /dev/sda2
Then check:
sudo pvs
sudo vgs
If the Volume Group now has additional free space, extend the Logical Volume:
sudo lvextend -l +100%FREE /dev/ubuntu-vg/root
Then resize the filesystem:
sudo resize2fs /dev/ubuntu-vg/root
This distinction is important:
New disk space
      │
      ├── Existing LVM partition was extended
      │       └── pvresize
      │
      └── New LVM partition was created
              └── pvcreate + vgextend
Verify everything
Once the resize is complete, check all the layers.
Check the disk
lsblk
Check the Physical Volumes
sudo pvs
Check the Volume Group
sudo vgs
Check the Logical Volumes
sudo lvs
Check the filesystem
df -h
For example, you should now see:
Filesystem                  Size  Used Avail Use% Mounted on
/dev/mapper/ubuntu--vg-root  95G   19G   72G  21% /
The important thing is that the size reported by df -h has increased.
Troubleshooting
lvextend says there is not enough free space
Check the Volume Group:
sudo vgs
Look at the VFree column.
If it shows:
VFree 0
then LVM has no unallocated extents available.
If you created a new partition, make sure it was added to the Volume Group:
sudo vgextend ubuntu-vg /dev/sda3
If you expanded an existing partition, make sure you ran:
sudo pvresize /dev/sda2
df -h still shows the old size
Check the Logical Volume:
sudo lvs
If the LV increased but df -h still shows the old filesystem size, resize the filesystem:
sudo resize2fs /dev/ubuntu-vg/root
The new partition does not appear
Try:
sudo partprobe
Then:
lsblk
If it still does not appear, a reboot may be required.
I don’t know which Logical Volume is mounted on /
Use:
df -h /
or:
findmnt /
You can then compare the device with:
sudo lvs
Important: extending is safer than shrinking
This guide is specifically about increasing disk space.
Increasing an LVM Logical Volume and growing an ext4 filesystem is generally straightforward.
Shrinking is different.
Do not simply run:
lvreduce
to make a filesystem smaller.
The filesystem normally needs to be reduced first, and the process is considerably more dangerous. An incorrect shrink operation can destroy data.
If you need to reduce a filesystem or partition, take a backup and follow a procedure specifically designed for the filesystem you are using.
Quick reference
For an existing LVM partition that has been expanded:
sudo pvresize /dev/sda2
sudo lvextend -l +100%FREE /dev/ubuntu-vg/root
sudo resize2fs /dev/ubuntu-vg/root
For a newly created LVM partition:
sudo pvcreate /dev/sda3
sudo vgextend ubuntu-vg /dev/sda3
sudo lvextend -l +100%FREE /dev/ubuntu-vg/root
sudo resize2fs /dev/ubuntu-vg/root
Verify the result:
df -h
Final thoughts
The most important thing to remember is that increasing a virtual disk does not automatically increase the filesystem.
With LVM, think of the process as a chain:
Disk
 ↓
Partition
 ↓
Physical Volume
 ↓
Volume Group
 ↓
Logical Volume
 ↓
Filesystem
You need to make sure each layer has been extended before expecting the additional space to appear in df -h.
This procedure has been particularly useful for me when working with older Ubuntu virtual machines where replacing or rebuilding the server isn’t a realistic option.