
A practical guide to building a small, hardened HAProxy load balancer on Rocky Linux 10 using Layer 4 TCP load balancing, TLS passthrough, multiple frontends and a separate DMZ interface.
HAProxy is one of those tools that can look intimidating when you first open the configuration file. In reality, a basic Layer 4 load balancer can be surprisingly small and lightweight.
I recently built a small, production-style HAProxy load balancer on a minimal Rocky Linux 10 installation. The server fronts several applications, including an application hosted in a DMZ, and passes HTTPS traffic through to the backend servers without terminating TLS.
That last point is important.
The HAProxy server doesn’t hold any certificates and doesn’t decrypt the application traffic. It simply accepts the TCP connection, selects a healthy backend and forwards the encrypted connection to it. TLS remains between the client and the application server.
This guide documents the build from start to finish, including the networking, HAProxy configuration, SELinux, firewalld, logging, Active Directory integration, hardening, testing and — perhaps most importantly — the problems I encountered along the way.
Everything in this article uses deliberately generic hostnames, IP addresses and account names. Replace them with values appropriate for your own environment.
What we’re building
The finished system is a single Rocky Linux 10 VM running HAProxy.
Each application has its own frontend IP address and its own backend pool. HAProxy operates in TCP mode, so the encrypted HTTPS traffic is passed through without HAProxy terminating TLS.
The certificates remain installed on the application servers.
The basic design looks like this:
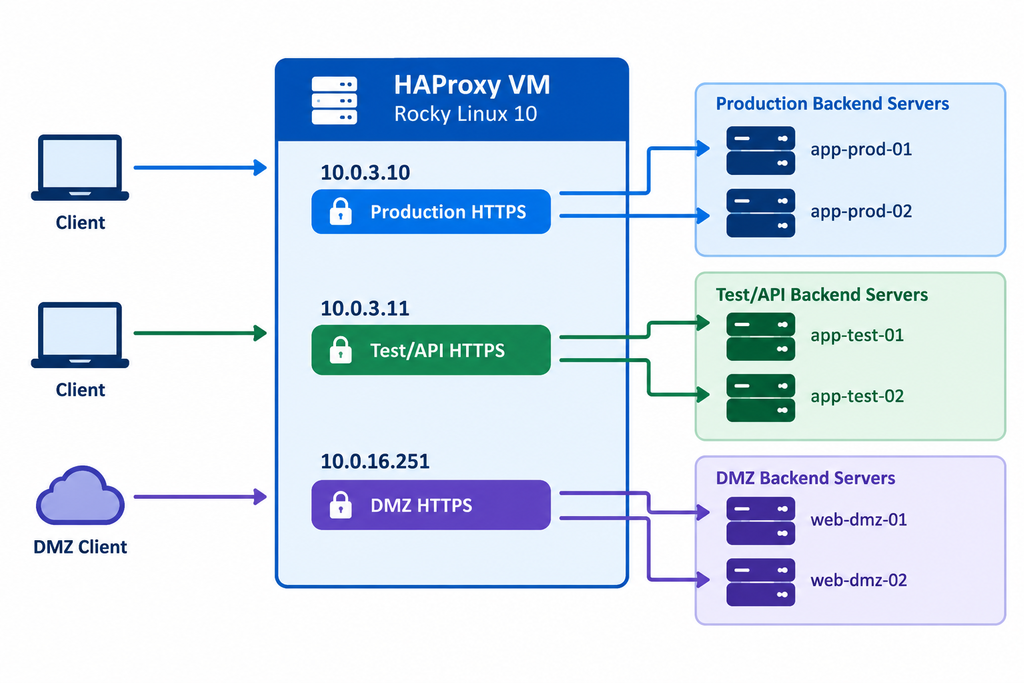
The three application pools are:
| Pool | Frontend | Backends |
|---|---|---|
| Production app | 10.0.3.10:443 | app-prod-01 (10.0.0.108), app-prod-02 (10.0.0.109) |
| Test / API | 10.0.3.11:443 | app-test-01 (10.0.0.115), app-test-02 (10.0.0.124) |
| DMZ web | 10.0.16.251:443 | web-dmz-01 (10.0.16.30), web-dmz-02 (10.0.16.31) |
Placeholder values
Throughout this article I’ll use the following example values:
| Item | Value |
|---|---|
| Load balancer hostname | lb01.corp.example.com |
| Local fallback account | localadmin |
| AD domain | corp.example.com |
| Internal network | 10.0.0.0/22 |
| Internal gateway | 10.0.3.254 |
| DNS/NTP | 10.0.0.11, 10.0.0.10 |
| DMZ network | 10.0.16.0/24 |
| Admin workstation subnet | 10.0.52.0/24 |
These are examples only. Don’t copy them into a production environment without adapting them to your own network.
Why use TLS passthrough?
There are two common ways of putting HAProxy in front of an HTTPS application.
The first is TLS termination. HAProxy receives the HTTPS connection, decrypts it and then establishes another connection to the backend.
The second is TLS passthrough.
With passthrough, HAProxy doesn’t need to know anything about the application’s certificates. It operates at Layer 4 and simply proxies the TCP connection.
For this particular deployment, TLS passthrough made sense for several reasons.
No certificates on the load balancer
The certificates remain on the application servers.
That means there is another machine that doesn’t need certificate renewal, private-key protection or certificate deployment.
Very low resource requirements
HAProxy isn’t performing TLS encryption and decryption for client connections. It’s primarily moving TCP traffic between sockets.
This makes it possible to run the load balancer on a very small VM.
The downside: source IP visibility
There is an important trade-off.
From the backend server’s perspective, the TCP connection originates from the HAProxy server rather than directly from the client.
HAProxy knows the original client address and can record it in its own logs, but the backend application won’t automatically see the client’s real source IP.
If the backend needs that information, there are alternatives such as the PROXY protocol, provided the backend supports it, or terminating TLS on HAProxy instead.
VM sizing
The VM I used was deliberately small:
- 2 vCPU
- 2 GB RAM
- 20 GB disk
For this type of workload, there’s little benefit in throwing a large amount of hardware at HAProxy.
In my testing, HAProxy itself used only around 13 MB of RAM.
Obviously, real resource requirements depend on connection counts, traffic levels, logging and configuration. Once you’re dealing with very large numbers of concurrent connections, memory and file descriptors become increasingly important, while network throughput can become the limiting factor.
For this type of deployment, however, adding a second load balancer for availability is much more useful than simply making the first VM larger.
One important virtualisation consideration
Rocky Linux 10 and other RHEL 10-based distributions have newer x86-64 CPU requirements than some older Linux releases.
If you’re installing the VM on an older hypervisor or with a deliberately old virtual CPU model, the installer may complain about unsupported CPU features.
If that happens, expose a newer CPU model to the VM. On VMware, using the host CPU where appropriate is one option.
Step 1 — Install Rocky Linux 10
Install Rocky Linux 10 using the Minimal Install profile.
The goal here is to keep the server small. There is no reason to install a graphical desktop or a collection of applications that the load balancer doesn’t need.
Once the operating system is installed, install the packages required for HAProxy and administration:
sudo dnf install -y haproxy socat policycoreutils-python-utils rsyslog firewalld open-vm-tools
If you’re not running VMware, open-vm-tools isn’t required.
Enable the services:
sudo systemctl enable --now firewalld
sudo systemctl enable --now rsyslog
sudo systemctl enable --now vmtoolsd
Check the HAProxy version:
haproxy -v
The build documented here used HAProxy 3.0.5 from AppStream.
Your version may differ depending on the Rocky Linux repositories available at the time you build the server.
Step 2 — Configure the network
This server has two network interfaces:
- An internal interface
- A DMZ interface
The internal interface carries the normal server traffic and hosts the production and test frontend addresses.
The DMZ interface carries the DMZ frontend.
The important thing here is that the DMZ interface must not become a second default route.
Internal interface
In this example, ens33 has two IP addresses:
10.0.3.1010.0.3.11
Configure the NetworkManager connection:
sudo nmcli con mod "ens33" \
  ipv4.method manual \
  ipv4.addresses "10.0.3.10/22,10.0.3.11/22" \
  ipv4.gateway 10.0.3.254 \
  ipv4.dns "10.0.0.11,10.0.0.10"

sudo nmcli con up "ens33"
Check that both addresses are actually present:
ip -4 addr show ens33
Check the address before using it
Before assigning an additional address to a server, make sure another device isn’t already using it.
For example:
sudo arping -I ens33 -c 3 10.0.3.11
No response doesn’t guarantee an address is unused, but it is a useful first check.
Also check your DHCP scopes and IP address management system. An address that doesn’t answer an ARP request today can still be part of a DHCP scope and become a problem later.
Configure the DMZ interface
The second interface in this example is ens35.
The DMZ network is:
10.0.16.0/24
The HAProxy DMZ address is:
10.0.16.251
There is intentionally no gateway configured on this interface.
If NetworkManager has created an automatic connection profile for the interface, remove it first:
sudo nmcli con delete "Wired connection 1"
Create a static connection:
sudo nmcli con add type ethernet \
  ifname ens35 \
  con-name dmz \
  ipv4.method manual \
  ipv4.addresses 10.0.16.251/24 \
  ipv4.never-default yes \
  ipv6.method disabled \
  connection.zone dmz
Bring the connection up:
sudo nmcli con up dmz
Then check the routing table:
ip route
The important point is that there should be one default route, via the internal gateway.
The DMZ interface should have its connected route but should not install another default route.
This is a small configuration detail that is extremely important on a dual-homed server.
Step 3 — Configure HAProxy
Back up the original configuration before replacing it:
sudo cp /etc/haproxy/haproxy.cfg \
  /etc/haproxy/haproxy.cfg.original
Now edit:
/etc/haproxy/haproxy.cfg
For this deployment, the configuration is deliberately simple:
global
    log         127.0.0.1 local2
    chroot      /var/lib/haproxy
    maxconn     20000
    user        haproxy
    group       haproxy
    stats socket /var/lib/haproxy/stats mode 660 level admin

defaults
    mode                tcp
    log                 global
    option              tcplog
    option              dontlognull
    retries             3
    timeout connect     5s
    timeout client      5m
    timeout server      5m
    timeout check       5s

frontend prod_in_10.0.3.10
    bind 10.0.3.10:443
    default_backend prod_app_servers

backend prod_app_servers
    balance leastconn
    server app-prod-01 10.0.0.108:443 check check-ssl verify none inter 3s fall 3 rise 2
    server app-prod-02 10.0.0.109:443 check check-ssl verify none inter 3s fall 3 rise 2

frontend test_in_10.0.3.11
    bind 10.0.3.11:443
    default_backend test_app_servers

backend test_app_servers
    balance leastconn
    server app-test-01 10.0.0.115:443 check check-ssl verify none inter 3s fall 3 rise 2
    server app-test-02 10.0.0.124:443 check check-ssl verify none inter 3s fall 3 rise 2

frontend dmz_in_10.0.16.251
    bind 10.0.16.251:443
    default_backend dmz_web_servers

backend dmz_web_servers
    balance leastconn
    server web-dmz-01 10.0.16.30:443 check check-ssl verify none inter 3s fall 3 rise 2
    server web-dmz-02 10.0.16.31:443 check check-ssl verify none inter 3s fall 3 rise 2

listen stats
    mode http
    bind 10.0.3.10:8404
    stats enable
    stats uri /stats
    stats refresh 10s
    stats auth admin:CHANGE_ME_TO_A_STRONG_PASSWORD
Obviously, don’t leave the example statistics password in place.
Understanding the configuration
There isn’t actually a huge amount happening here.
TCP mode
mode tcp
This tells HAProxy to operate at Layer 4.
HAProxy isn’t acting as an HTTP reverse proxy and isn’t terminating TLS. It is proxying the TCP connections.
Separate frontend addresses
Each application has its own IP address:
bind 10.0.3.10:443
and:
bind 10.0.3.11:443
The DMZ application has its own address:
bind 10.0.16.251:443
This is preferable here to simply using:
bind *:443
because it makes the network separation explicit.
The HAProxy configuration clearly tells you which address belongs to which application.
Least connections
The backend uses:
balance leastconn
Rather than simply sending connections to the servers in a round-robin pattern, HAProxy considers the number of active connections and sends new connections towards the server with the fewest.
This is particularly useful when requests or connections don’t all have the same duration.
TLS health checks
Each backend uses:
check check-ssl verify none
The health check therefore performs a TLS handshake with the backend instead of merely checking whether TCP port 443 is open.
verify none means HAProxy doesn’t validate the certificate presented by the backend during this health check.
The check is therefore useful for answering:
Is there actually a TLS service listening on this backend?
rather than simply:
Is something listening on TCP 443?
For environments where certificate validation or SNI is important to the health check, the health-check configuration should be adapted accordingly.
Failure and recovery timing
The backend configuration also contains:
inter 3s fall 3 rise 2
This means HAProxy checks the backend every three seconds.
Three consecutive failures mark the server as down, while two successful checks bring it back.
In practice, a failed server should therefore be detected after roughly nine seconds.
Don’t forget the packaged configuration
One of the problems I encountered was assuming that replacing haproxy.cfg meant there was nothing else to worry about.
The packaged Rocky Linux configuration can also load configuration files from:
/etc/haproxy/conf.d/
If those files contain duplicate sections or example configuration, HAProxy can fail to start or behave differently from what you expect.
For this build, I kept the directory empty.
Before starting HAProxy, always validate the configuration:
sudo haproxy -c \
  -f /etc/haproxy/haproxy.cfg \
  -f /etc/haproxy/conf.d
Don’t skip this step.
A configuration check takes seconds and can save you from taking down the load balancer with a simple typo.
Step 4 — systemd, SELinux and firewalld
There are three parts to getting the service running cleanly on Rocky Linux:
- systemd
- SELinux
- firewalld
All three matter.
Increase the file descriptor limit
A proxied connection involves multiple sockets, so the number of open file descriptors can become important as connection counts increase.
Create a systemd override:
sudo systemctl edit haproxy
Add:
[Service]
LimitNOFILE=100000
Save the override.
You can verify the resulting service configuration with:
systemctl show haproxy | grep LimitNOFILE
SELinux
Rocky Linux runs SELinux in enforcing mode by default, and that’s something you should keep.
HAProxy is already configured with appropriate SELinux policy for its normal operation, but the statistics listener on TCP 8404 needs to be labelled as an appropriate HTTP port.
Add the port:
sudo semanage port -a -t http_port_t -p tcp 8404
This was one of the issues I encountered during the build.
The HAProxy configuration was correct, but HAProxy couldn’t bind the statistics socket because SELinux was preventing it.
The journal showed an error similar to:
cannot bind socket (Permission denied)
It was tempting to look at the HAProxy configuration itself, but the missing SELinux port label was the real cause.
Keep haproxy_connect_any disabled
I deliberately left the SELinux boolean:
haproxy_connect_any
disabled.
The backends in this configuration are on standard ports and don’t require HAProxy to make arbitrary outbound connections.
Keeping the policy restrictive is preferable to enabling a broader permission simply because it makes troubleshooting easier.
Configure firewalld
The two network interfaces belong to different firewalld zones.
The internal interface uses the default public zone.
The DMZ interface uses the dmz zone.
This gives us an additional layer of separation.
For the internal interface, allow HTTPS and allow the HAProxy statistics page only from the administration subnet:
sudo firewall-cmd --permanent \
  --zone=public \
  --add-service=https

sudo firewall-cmd --permanent \
  --zone=public \
  --add-rich-rule='rule family="ipv4" source address="10.0.52.0/24" port port="8404" protocol="tcp" accept'
For the DMZ:
sudo firewall-cmd --permanent \
  --zone=dmz \
  --add-service=https

sudo firewall-cmd --permanent \
  --zone=dmz \
  --remove-service=ssh
Reload the configuration:
sudo firewall-cmd --reload
Check the active zones:
sudo firewall-cmd --get-active-zones
The result should show the internal and DMZ interfaces assigned to the expected zones.
Start HAProxy
Once the configuration, SELinux and firewall are ready:
sudo haproxy -c \
  -f /etc/haproxy/haproxy.cfg \
  -f /etc/haproxy/conf.d
If the check passes:
sudo systemctl enable --now haproxy
Check the listeners:
sudo ss -tlnp | grep -E ':443|:8404'
You should see HAProxy listening on the configured HTTPS addresses and on the internal statistics port.
Access the HAProxy statistics page
HAProxy also provides a simple web-based statistics page showing the current state of the load balancer and its backend servers.
With the configuration above, the statistics interface is available on the internal management address:
You can open this from an authorised management workstation.
You should be prompted for the HAProxy statistics username and password configured in the listen stats section:
listen stats
    mode http
    bind 10.0.3.10:8404
    stats enable
    stats uri /stats
    stats refresh 10s
    stats auth admin:CHANGE_ME_TO_A_STRONG_PASSWORD
The dashboard provides a useful at-a-glance view of the HAProxy environment, including:
- Frontend status
- Backend status
- Individual server health
- Current sessions
- Connection rates
- Data transferred
- Servers marked UP or DOWN
- Session errors and connection errors
This is particularly useful when troubleshooting a backend server. Rather than relying solely on application testing or log files, you can immediately see whether HAProxy considers each backend healthy.
For example, if app-prod-01 fails its health checks, it will be shown as unavailable while traffic continues to be directed towards the remaining healthy backend.
Keep the statistics interface restricted
The statistics page should not be exposed to the DMZ or the wider network.
In this configuration, port 8404 is only permitted from the administration subnet through the firewalld rich rule configured earlier.
This is an administrative interface rather than an application endpoint, so there is little reason for normal clients to have access to it.
If you change the management network or firewall configuration, verify that the statistics page remains restricted to authorised administrators.
Step 5 — Configure logging
HAProxy sends its logs to syslog.
On this build, rsyslog listens on UDP port 514 on the loopback interface.
Edit:
/etc/rsyslog.conf
and enable:
module(load="imudp")
input(type="imudp" port="514" address="127.0.0.1")
Then create a dedicated HAProxy logging rule:
echo 'local2.* /var/log/haproxy.log' | \
  sudo tee /etc/rsyslog.d/haproxy.conf
Validate the rsyslog configuration:
sudo rsyslogd -N1
Then restart rsyslog:
sudo systemctl restart rsyslog
HAProxy logs should now appear in:
/var/log/haproxy.log
The Rocky Linux package also provides logrotate configuration.
I recommend testing it rather than assuming it works:
sudo logrotate -f /etc/logrotate.d/haproxy
Generate some traffic and confirm that new entries are being written to the current log.
Step 6 — Time synchronisation and Active Directory
Joining the load balancer to Active Directory is optional.
If you do join it, get time synchronisation right first.
Kerberos is particularly sensitive to clock differences, and a significant time difference between the Linux server and domain controllers can cause authentication to fail.
In this example, the domain controllers are:
10.0.0.11
10.0.0.10
Edit:
/etc/chrony.conf
and configure the domain controllers as the time sources:
server 10.0.0.11 iburst
server 10.0.0.10 iburst
Restart chronyd:
sudo systemctl restart chronyd
Check the sources:
chronyc sources -v
A synchronised source should be marked appropriately, typically with ^*.
Join the server to Active Directory
Set the hostname:
sudo hostnamectl set-hostname lb01.corp.example.com
Install the required packages:
sudo dnf install -y \
  realmd \
  sssd \
  sssd-ad \
  adcli \
  krb5-workstation \
  oddjob \
  oddjob-mkhomedir \
  samba-common-tools
Discover the domain:
realm discover corp.example.com
Join it:
sudo realm join -U <admin-user> corp.example.com
Enable home directory creation:
sudo authselect enable-feature with-mkhomedir
Enable oddjob:
sudo systemctl enable --now oddjobd
Restrict AD access
Don’t simply allow every domain administrator to log into the load balancer.
I prefer using a dedicated AD security group.
For example:
Linux-LB-Admins
First deny general access:
sudo realm deny --all
Then permit the dedicated group:
sudo realm permit -g 'Linux-LB-Admins@corp.example.com'
Create a sudoers file:
sudo visudo -f /etc/sudoers.d/lb-admins
Add:
%linux-lb-admins@corp.example.com ALL=(ALL) ALL
The sudoers file needs restrictive permissions:
sudo chmod 0440 /etc/sudoers.d/lb-admins
Validate it:
sudo visudo -c
This is much better than giving broad access to Domain Admins.
And keep the local localadmin account available as a recovery path if Active Directory or the domain controllers become unavailable.
Step 7 — Harden SSH
The load balancer doesn’t need SSH exposed on its DMZ interface.
I also prefer to bind SSH explicitly to the internal management address.
Create:
/etc/ssh/sshd_config.d/50-listen.conf
with:
ListenAddress 10.0.3.10
You can create it with:
echo 'ListenAddress 10.0.3.10' | \
  sudo tee /etc/ssh/sshd_config.d/50-listen.conf
Validate the configuration:
sudo sshd -t
If it passes:
sudo systemctl restart sshd
Make SSH wait for the network
There is another subtle problem here.
Because SSH is explicitly bound to a particular IP address, the network needs to be available before sshd starts.
Create a systemd override:
sudo mkdir -p /etc/systemd/system/sshd.service.d
Then:
printf '[Unit]\nAfter=network-online.target\nWants=network-online.target\n' | \
  sudo tee /etc/systemd/system/sshd.service.d/wait-network.conf
Reload systemd:
sudo systemctl daemon-reload
Always test a new SSH connection before closing your existing session.
This sounds obvious, but it is exactly the sort of change that can turn a perfectly healthy server into a console-only recovery job if you get the address or configuration wrong.
Prove the server isn’t routing between networks
A dual-homed server naturally deserves extra scrutiny.
The fact that HAProxy has an internal NIC and a DMZ NIC doesn’t mean the machine should become an IP router.
Kernel forwarding should be disabled.
Check it:
sysctl -a 2>/dev/null | grep '\.forwarding'
You want the relevant forwarding values to be 0.
Check firewalld policies:
sudo firewall-cmd --get-active-policies
And inspect the DMZ zone:
sudo firewall-cmd --zone=dmz --list-all
The goal is that the DMZ zone exposes only the services that are deliberately required.
HAProxy is a proxy, not a router
This distinction is worth understanding.
When a client connects to:
10.0.16.251:443
HAProxy accepts that connection.
It then creates a separate connection to something like:
10.0.16.30:443
The Linux kernel isn’t simply forwarding the original packet between interfaces.
That’s fundamentally different from enabling IP forwarding and turning the server into a router.
With forwarding disabled, no inter-zone firewall policy and no accidental masquerading or forwarding rules, the server isn’t intended to provide a general route from the DMZ into the internal network.
However, don’t treat that as a permanent guarantee.
Firewalld configuration can change. Someone could later enable masquerading, forward ports or create an inter-zone policy.
After significant firewall changes, repeat the forwarding and zone checks.
Step 8 — Test the load balancer
A production build isn’t complete simply because the HAProxy service says:
active (running)
Test the actual functionality.
Check backend state from the command line
The HAProxy statistics page provides the easiest visual way to check backend health, but the same information is available from the HAProxy statistics socket for scripting and troubleshooting.
Query the server state:
echo "show servers state" | \
  sudo socat stdio /var/lib/haproxy/stats
You should be able to identify your configured backend servers and determine whether they are UP.
Test an HTTPS connection
From an appropriate test system:
curl -vk https://10.0.3.10/ \
  2>&1 | grep -E 'HTTP/|subject:'
The -k option is used here because the test is being made against an IP address and the certificate chain may not validate in the testing environment.
Also check the HAProxy log:
sudo tail -3 /var/log/haproxy.log
You want to prove both sides of the connection:
Client
  ↓
HAProxy
  ↓
Backend
A successful connection from the HAProxy server itself proves the HAProxy configuration, but it doesn’t necessarily prove that the real client network path works.
Test load balancing
Sequential requests aren’t a particularly good way to demonstrate leastconn.
A request can complete before the next request begins.
Instead, create overlapping connections:
for i in $(seq 1 20); do
    curl -sk -o /dev/null https://10.0.3.10/ &
done

wait
Then inspect the logs:
sudo tail -20 /var/log/haproxy.log | \
  grep -o 'app-prod-0[12]' | \
  sort | uniq -c
This should give you an indication of where the connections were sent.
Test backend failure
This is one of the most important tests.
Stop the web service on one backend.
HAProxy should detect the failure after the configured health checks fail.
With:
inter 3s
fall 3
the backend should normally be marked DOWN after approximately nine seconds.
Traffic should continue through the remaining healthy server.
Start the service again and HAProxy should detect it after the configured successful checks:
rise 2
This is what turns a load balancer from something that simply distributes traffic into something that can actually provide basic application resilience.
Reboot test
Finally, reboot the server.
But don’t just issue: reboot
and walk away.
For a production-style build, keep the hypervisor console open.
After the reboot, verify:
systemctl status haproxy
systemctl status firewalld
systemctl status rsyslog
Check the addresses:
ip -4 addr
Check the routes:
ip route
Check the listeners:
ss -tlnp
Then check the HAProxy backend state again.
A server that has never been rebooted successfully isn’t a fully tested server.
Day-two operations
Building the server is only half the job.
The other half is making changes without breaking production.
Reload versus restart
For configuration changes, prefer:
systemctl reload haproxy
A reload allows HAProxy to apply the new configuration while maintaining existing connections where possible.
A restart is more disruptive:
systemctl restart haproxy
Use a restart when it is genuinely required, particularly when changing things that cannot be applied through a normal reload.
Before any change, validate the configuration first:
sudo haproxy -c \
  -f /etc/haproxy/haproxy.cfg \
  -f /etc/haproxy/conf.d
Drain a backend before maintenance
One of the useful features of the HAProxy statistics socket is that you can take a backend server out of service without immediately killing existing connections.
For example:
echo "set server prod_app_servers/app-prod-01 state drain" | \
  sudo socat stdio /var/lib/haproxy/stats
The server can then be patched or maintained while existing connections drain.
Once maintenance is complete:
echo "set server prod_app_servers/app-prod-01 state ready" | \
  sudo socat stdio /var/lib/haproxy/stats
This is considerably nicer than simply shutting the backend down and hoping users don’t notice.
Adding another backend
Adding another backend server is straightforward.
Add another server line to the appropriate backend:
server app-prod-03 10.0.0.110:443 check check-ssl verify none inter 3s fall 3 rise 2
Then:
- Confirm the new server is reachable from HAProxy.
- Confirm TCP 443 is permitted.
- Confirm the application is healthy.
- Run the HAProxy configuration check.
- Reload HAProxy.
- Confirm the new server becomes UP.
- Generate test traffic.
The backend should also have the appropriate certificate and application configuration.
Adding a new application
If you need another frontend IP, add the IP address to the Linux interface before configuring HAProxy to bind to it.
For example:
ip -4 addr show ens33
Confirm the new address is actually present.
Then add the new frontend and backend sections to HAProxy.
If HAProxy is configured to bind to an address that the server doesn’t own, it won’t start correctly.
This sounds obvious, but it’s an easy mistake to make when adding applications.
Certificate management with TLS passthrough
One of the advantages of this design is that HAProxy doesn’t contain the certificates.
Certificate renewals therefore happen on the application servers.
The load balancer doesn’t need to be changed simply because a backend certificate is renewed.
You can still inspect what a backend is presenting using curl:
curl -vk -o /dev/null \
  --connect-timeout 5 \
  https://10.0.0.149/ \
  2>&1 | grep -E 'subject:|expire date:'
For production certificate troubleshooting, I would normally use the appropriate hostname rather than an IP address, particularly where SNI is involved.
The problems I encountered
This is probably the most useful part of the whole build.
These are the issues that cost me time while putting the server together.
1. The packaged configuration was still being loaded
The first HAProxy instance I started appeared healthy, but it was listening on the wrong ports and still had sample backend configuration.
The clue was that:
show servers state
didn’t contain the backend names I expected.
The lesson:
Don’t assume that replacing the main configuration file means there isn’t another configuration being loaded.
Check /etc/haproxy/conf.d/ and validate the complete configuration.
2. SELinux was responsible for the statistics binding failure
HAProxy reported:
cannot bind socket (Permission denied)
My first instinct was to blame the HAProxy configuration.
The actual problem was SELinux.
The statistics port hadn’t been labelled correctly.
This fixed it:
sudo semanage port -a -t http_port_t -p tcp 8404
This is a good reminder that on Rocky Linux, a generic “Permission denied” doesn’t necessarily mean Linux file permissions.
SELinux may be doing exactly what it was designed to do.
3. The secondary IP wasn’t actually live
NetworkManager can happily contain an address in a connection profile without that address necessarily being active on the interface.
I encountered a situation where:
nmcli device reapply
reported success, but the address wasn’t actually present.
The important command is:
ip -4 addr show
If the address isn’t there, HAProxy won’t be able to bind to it.
Bring the connection back up if necessary:
nmcli con up "ens33"
4. A new DMZ NIC was stuck waiting for DHCP
The new interface initially appeared to be waiting for IP configuration.
The reason was simple: the network didn’t provide DHCP.
NetworkManager had created an automatic connection profile.
Deleting that profile and creating an explicit static configuration fixed it:
sudo nmcli con delete "Wired connection 1"
followed by the static DMZ profile.
5. leastconn looked broken
When I tested the load balancer with sequential requests, the traffic appeared to keep going to the same backend.
At first glance, that made it look like leastconn wasn’t working.
The problem was the test.
The requests completed too quickly.
By the time the next request arrived, the previous connection had already disappeared, so there was effectively no difference in the active connection count.
Running requests in parallel produced a much more meaningful test.
6. A 404 response doesn’t necessarily mean HAProxy is broken
This is particularly important when troubleshooting application load balancers.
A request through the load balancer can return:
HTTP/1.1 404
and HAProxy can still be working perfectly.
The 404 might be generated by IIS, Apache, Nginx or the application itself.
It can also happen when testing by IP address when the application expects a particular hostname.
Always test the backend directly as well as through HAProxy.
That lets you separate:
Network problem
        ↓
HAProxy problem
        ↓
Backend problem
        ↓
Application problem
7. Minimal installations don’t contain every troubleshooting tool
A minimal Rocky Linux installation doesn’t necessarily include utilities such as:
ncopenssltcpdump
That’s not a problem, but it can make troubleshooting less familiar.
For a basic TCP test, Bash can use /dev/tcp:
timeout 3 bash -c '</dev/tcp/10.0.16.30/443'
And curl -v is useful for inspecting HTTPS behaviour.
If you need deeper packet-level troubleshooting, install the appropriate tools rather than trying to diagnose everything from application logs.
8. Sudoers permissions matter
Files in:
/etc/sudoers.d/
need appropriate permissions.
For the custom file used above:
sudo chmod 0440 /etc/sudoers.d/lb-admins
Then:
sudo visudo -c
Don’t ignore warnings from visudo.
A configuration that works today but contains invalid permissions isn’t something I’d want sitting on a production server.
9. Test from the actual client network
One of the easiest mistakes to make with a load balancer is testing everything from the load balancer itself.
That proves the backend is reachable.
It doesn’t necessarily prove that the real client can reach the frontend.
For example:
Client
  ↓
Firewall
  ↓
Routing
  ↓
HAProxy
  ↓
Backend
There are several places that can fail.
For a DMZ application in particular, test from a real DMZ client or from a representative network path.
In some network designs, return traffic can also become an issue if the backend’s routing doesn’t send responses through the expected path.
10. Don’t put credentials into backups or public documentation
The HAProxy statistics authentication shown earlier is deliberately simple for demonstration.
In a real environment, don’t treat the HAProxy configuration as something that can safely be published or copied everywhere.
A configuration backup can contain credentials or other sensitive information.
Keep configuration backups protected, and redact credentials before putting configuration into:
- Git repositories
- tickets
- documentation
- chat
- screenshots
- public websites
This is especially important for a technical blog.
Security considerations for a dual-homed load balancer
Putting a server on both an internal network and a DMZ deserves careful consideration.
The configuration above is designed so that HAProxy proxies specific application connections rather than acting as a general-purpose router.
However, the security boundary is still important.
Consider a separate DMZ-only load balancer
A single HAProxy process is serving both the internal and DMZ-facing applications.
That may be perfectly acceptable for some environments.
For higher-security environments, policy may require the DMZ-facing load balancer to be a separate VM that has no internal network interface.
The HAProxy configuration can be almost identical, but the network architecture is different.
Be careful with Active Directory
Joining a DMZ-facing system to Active Directory increases its relationship with the internal environment.
The machine has an AD computer account and depends on domain infrastructure.
If that isn’t necessary, don’t do it simply because domain joining is convenient.
A local account with SSH keys may be a more appropriate design for some DMZ systems.
If AD integration is required, restrict interactive access to a dedicated administrative group.
Keep management interfaces internal
The HAProxy statistics interface should not be exposed to the DMZ.
Neither should SSH.
The DMZ zone in this example is intentionally restricted to HTTPS.
Centralise logging
A production load balancer should ideally send its logs to a central logging platform.
That means that if the server is compromised or destroyed, you haven’t lost the only copy of the evidence.
It also makes monitoring HAProxy events considerably easier.
Don’t make the load balancer your DMZ firewall
The perimeter firewall should remain responsible for controlling which networks and systems can communicate.
HAProxy should only provide the application proxying functionality it is supposed to provide.
What I would add next
The configuration above works well as a simple Layer 4 load balancer, but there are several natural improvements.
High availability
The biggest limitation is that this design has a single HAProxy server.
If that VM goes down, all applications behind it go down with it.
The next logical step is a second HAProxy node using keepalived and VRRP.
The frontend addresses can then move between the two nodes.
For a dual-homed design, the second node would also need an appropriately configured DMZ interface.
The architecture becomes:
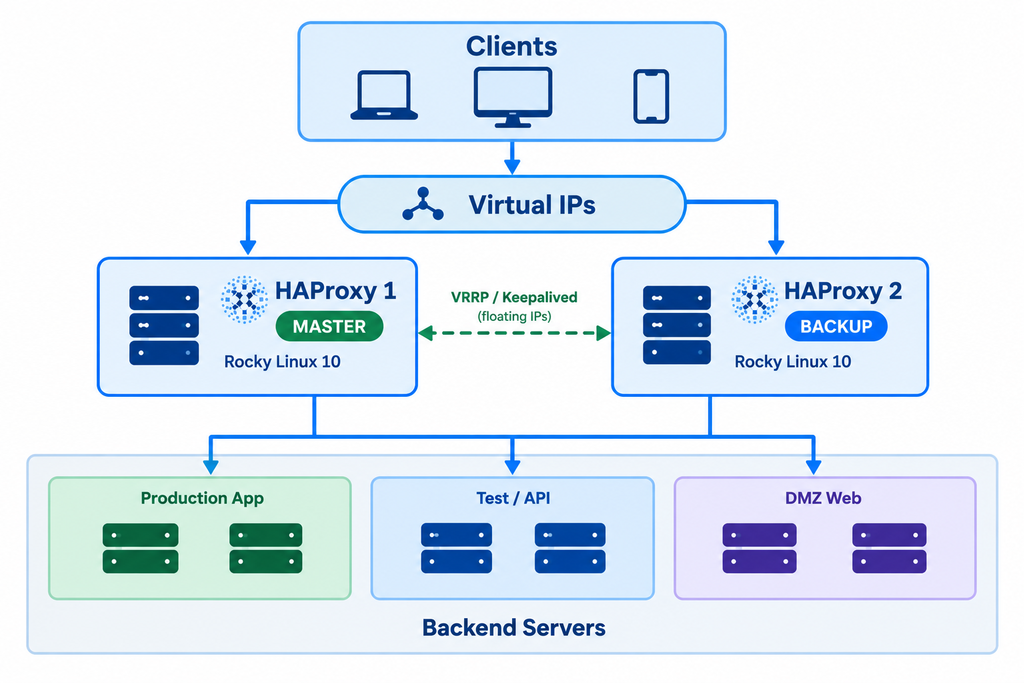
That removes the most obvious single point of failure.
Better application health checks
The current configuration checks whether the backend can successfully complete a TLS handshake.
That’s useful, but it doesn’t prove that the application itself is healthy.
A web server could happily complete a TLS handshake while the application behind it is completely broken.
A future improvement would be to use an HTTP health endpoint such as:
/health
and configure HAProxy to check that endpoint.
That gives you a much more meaningful definition of “healthy”.
PROXY protocol
If the backend applications need the original client IP address, the PROXY protocol is another option.
The important requirement is that the backend application or web server must understand the protocol.
If it doesn’t, don’t enable it blindly.
The other option is TLS termination on HAProxy, where HAProxy has more visibility into the application-layer traffic.
Centralised monitoring
HAProxy already provides useful information through its statistics socket and logs.
I’d recommend sending the logs to your central logging platform and creating alerts for events such as:
Backend DOWN
Backend UP
Repeated connection failures
High connection counts
HAProxy service stopped
That turns the load balancer from something you only investigate when users complain into something that can tell you when an application is having problems.
Keep the configuration in version control
Finally, keep a redacted copy of the HAProxy configuration in version control.
For example:
haproxy/
├── haproxy.cfg
├── README.md
└── changes.md
Don’t put passwords or other secrets into the repository.
A configuration history is extremely useful when troubleshooting:
“What changed immediately before this stopped working?”
It’s also useful when rebuilding the server.
Final thoughts
This isn’t a complicated HAProxy deployment.
That’s actually the point.
A small Rocky Linux VM, two network interfaces, a handful of IP addresses and a relatively small HAProxy configuration are enough to build a capable Layer 4 load balancer.
The difficult part isn’t the frontend and backend definitions.
It’s everything around them:
- making sure the network is configured correctly
- avoiding a second default route
- understanding SELinux
- configuring firewalld zones
- protecting management interfaces
- getting logging working
- testing failure scenarios
- validating the configuration before every change
- understanding what the backend actually sees
- and making sure the server survives a reboot
The most important lesson from this build is that “HAProxy is running” isn’t the same thing as “the load balancer is production ready.”
A production-ready build needs to be tested from the real client networks, needs to survive backend failures, needs to be recoverable after a reboot and needs to have the security boundaries around it properly understood.
For a small environment, this is a remarkably capable solution — and it can be built on a very modest VM.
The next step for this design would be adding a second HAProxy node with keepalived/VRRP, giving the frontend addresses somewhere to fail over when the primary load balancer disappears.
Until then, this gives you a solid, lightweight and well-understood Layer 4 load-balancing platform on Rocky Linux 10.